- Published on
Adding new features to an old game with Frida, Part I
- Authors

- Name
- Furkan Er
- @erfur_qwe
Table of contents
Dynamic instrumentation has been a thing I kept distant for a long while. For some reason I tend to solve everything with static approach, which costs me so much time and effort to get simple things done. So I was looking to get my hands dirty and recently I finally decided to use Frida seriously on a project. I wanted to explore what Frida had to offer, while working on a reverse engineering project.
The opportunity presented itself when I got my hands on a game that I played in my childhood: Mystery PI from SpinTop Games (and released by PopCap Games). It's a puzzle game where the player finds listed objects hidden in a given frame. It was a lot of fun back then, except that I couldn't progress through levels because I didn't understand most of the words. This time I was able to breeze through them and after completing the game I wanted to take a look under the hood.
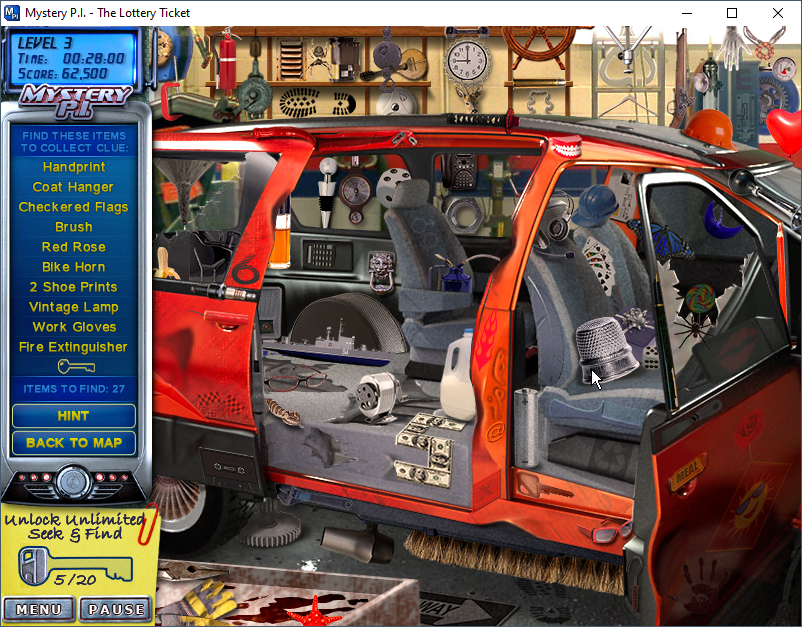
I already decided to approach it as a project, so I set myself up with some goals. The game doesn't allow resizing in windowed mode and its fixed at a 800x600 resolution, so I wanted to enable resizing in windowed mode as the first step. Of course the next step was to enable more "hints" :). Then finally, I wanted to implement some sort of multiplayer feature just for the kick of it.
As of writing this, the first goal is achieved. In this first post of (what I think is going to be) three, I'll walk through the basics of the game's implementation and how I instrumented it with Frida to scale its video output.
initial analysis
Initial analysis (quickly skimming through strings) revealed that the game is built on SDL. Since the game is released in 2007, it is a strong possibility that its not SDL2 but an older version. Later analysis showed that it's SDL1.2 (patch level 9).
First thing to notice is that there are almost no dependencies. Most of the libraries are statically linked and stripped, making the initial phase a bit hard. I'm also guilty of not having used a plugin to automatically name library functions. Though it wasn't that bad of a nuisance to go through since most of SDL functions reference at least one error string, therefore it was really trivial to figure out which is which. I named them manually as I went along.
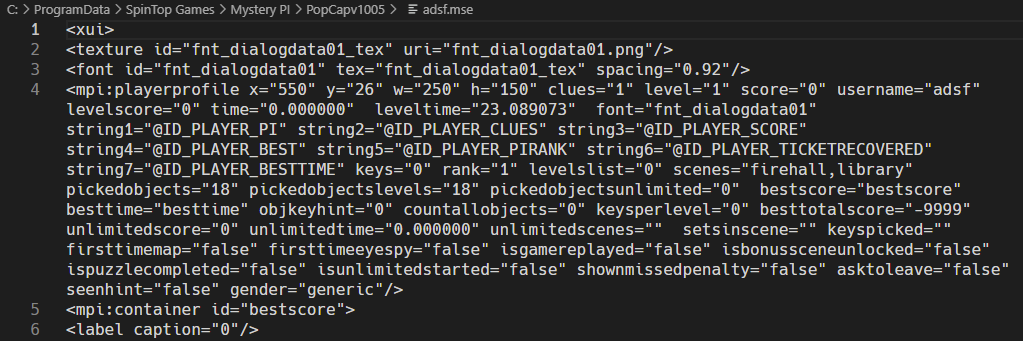
The game comes with a library named Resources.dll. Opening it up with GHIDRA revealed pretty much every asset the game used. Then I used pefile to dump all the resources. The dump consists of images, sounds, fonts and even some xml files that I later learned is in MSL (Mapping Specification Language) format. These files are used as plaintext databases for the assets, menu and level layouts etc. Even all of the objects' coordinates on the screen can be found in these files.

The game saves player data, highscores and options in ProgramData\SpinTop Games\Mystery PI\PopCapv1005. These files have the same format as the ones in Resources.dll, which means that they are in plaintext.
warming up
I haven't used frida for native instrumentation before, so I wanted to hook some simple functionality to get used to the api and the capabilities.
hooking fopen
I found the function the game uses to save player files. The Interceptor api is the bread and butter of Frida, so I put it to use by hooking the fopen function called inside. I didn't want to hook every single fopen call so I hooked the instruction that calls it.
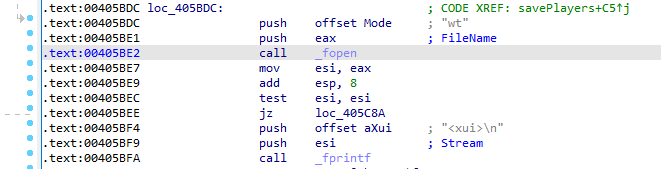
Since the function call is not complete when the hook triggers, the args argument of onEnter callback would not provide a correct view of the function arguments. Instead I fetched the pointer straight from eax register:
// hook fopen while saving a player
Interceptor.attach(ptr("0x405BDC"), {
    onEnter: function (args) {
        send({
            fname_buffer: this.context.eax,
            fname: this.context.eax.readAnsiString()
        });
    }
})
After this simple hook, I wanted to spice things up with a call to the game's own functions. For that I chose to work out how to toggle fullscreen.
toggling fullscreen
According to an SDL1.2 tutorial, the display is configured with a SDL_SetVideoMode call.
SDL_Surface * SDL_SetVideoMode (int width, int height, int bpp, Uint32 flags)
Looking for this call in the game's main function resulted in a couple functions that are called back-to-back.

Looking the values being passed, I determined the values required to enable fullscreen. I put these calls in the exports so that I can toggle fullscreen at will. I also wrote a call to check the current state of fullscreen flag.
rpc.exports = {
    checkDisplay() {
        var ctx = getContext();
        send({
            context: ctx,
            fullScreenFlag: ptr(0x004ECCC6).readU8(),
        })
    },
    setDisplay(flag) {
        var ctx = getContext();
        var setDisplay = new NativeFunction(ptr(0x401a50), "void", ["uint8", "pointer"]);
        var setFullscreen = new NativeFunction(ptr(0x40fc50), "void", ["pointer", "uint8"], "thiscall");

        setDisplay(flag, ctx);
        setFullscreen(ctx, flag);
    }
}
The exports can be called from python side with a couple lines (notice that api names are converted into snake case automatically):
api = script.exports
api.set_display(int(cmd[1]))
live-patching the windowed mode
The SDL_SetVideoMode call is also used to set the resolution. It is possible to force the game into a custom resolution by hooking this function and playing with the parameters. I set the resolution to 1600x1200.
Interceptor.attach(ptr(0x0046B6E0), {
    onEnter: function (args) {
        args[0] = ptr(1600);
        args[1] = ptr(1200);
        send({
            hook_name: "SDL_SetVideoMode",
            width: args[0],
            height: args[1],
            bpp: args[2],
            flags: args[3],
        })
    },
});

The output shows that the game is still running at 800x600, combined with the fact that coordinates are hardcoded in .mse files, it is obvious that the game wouldn't be cooperative in my quest. After that I focused solely on the video subsystem.
Since setting the resolution by itself is not enough, the video output should also match. My first thought was if the video subsystem supported scaling the output, to which the answer at this time was a no. There is a function for this in SDL2 named SDL_BlitScaled, though none of the tutorials, discussions on the web, even the API reference acknowledges the existence of scaling, stretching or resizing the output in SDL1.2. This bit is important as I'll come back to it later in this post.
It seemed that the time had come to start implementing a custom routine to scale the output myself. To that end I started looking at my options:
- implement a custom routine by hand either in js or c
- find a native implementation and embed it
First I wanted to play around for a bit, so I started with a javascript implementation.
where to hook the subsystem
At this point I had a general conception of what I wanted to do, but no idea of how to do it in practise. From what I gathered in SDL tutorials, objects are "blitted" onto a "surface" in each loop iteration:
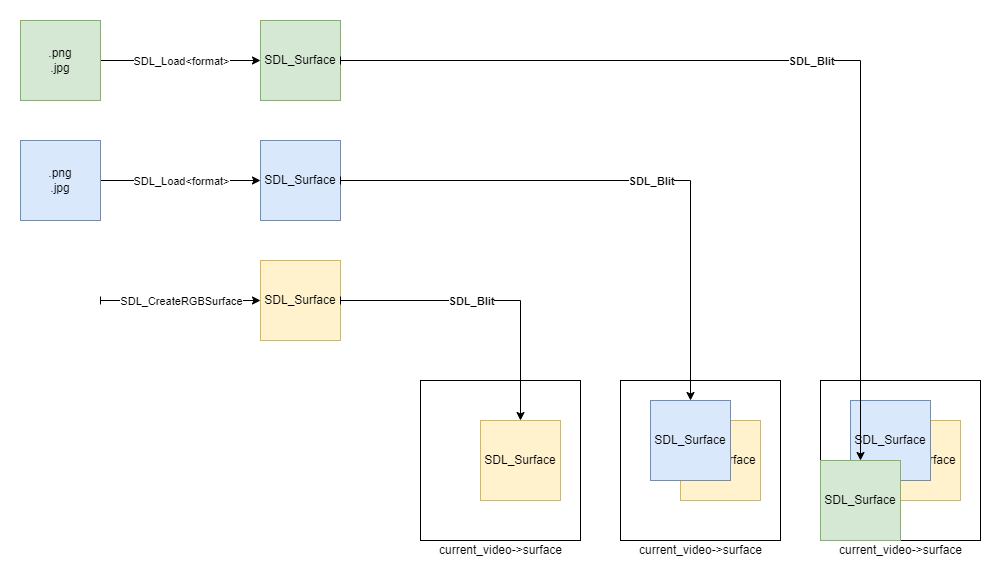
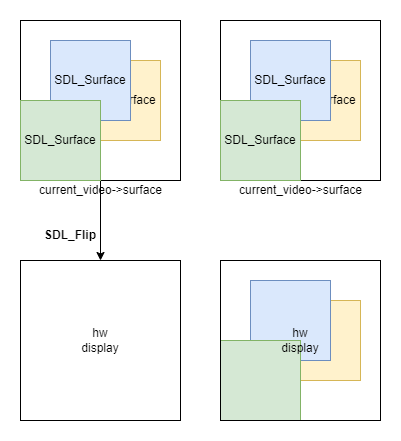
Then the surface is "flipped", meaning that it is updated in the hardware to be shown on the display.
My first approach was to hook the blit operations and scale each surface, and for simplicity I chose to scale everything by two and have a clean 1600x1200 output in the end.
I started by hooking SDL_BlitSurface and logging the operation.
// SDL_BlitSurface
Interceptor.attach(ptr(0x004665C0), {
    onEnter: function (args) {
        let src = new Surface(ptr(args[0]));
        let srcrect = new SDLRect(ptr(args[1]));
        let dst = new Surface(ptr(args[2]));
        let dstrect = new SDLRect(ptr(args[3]));
        send({
            hook_name: "SDL_BlitSurface",
            src: src,
            srcrect: srcrect,
            dst: dst,
            dstrect: dstrect,
        });
    }
})
Next up, I had to parse surface and rectangle structs, so I implemented classes for them. I also added a darkening effect with vertical black bars and a simple scale method.
class Surface {
    constructor(ptr) {
        // console.log('new surface');
        if (ptr == 0) {
            throw "NULL pointer";
        }
        this.ptr = ptr;
        this.width =  ptr.add(2 * 4).readU32();
        this.height = ptr.add(3 * 4).readU32();
        this.pitch =  ptr.add(4 * 4).readU16();
        this.pixels = ptr.add(5 * 4).readPointer();
        this.locked = ptr.add(11 * 4).readU32();
        this.bytesPerPixel = Math.trunc(this.pitch/this.width);
        this.bufferSize = this.pitch*this.height;

        // prepare a custom surface for a backup buffer
        this.customBuffer = Memory.alloc(this.bufferSize);
    }

    darken() {
        let srcRowLen = this.pitch;
        let bytesPerPixel = this.bytesPerPixel;
        let src = new Uint8Array(this.getOriginalBytes());

        for (let j=0; j<this.bufferSize; j+=srcRowLen) {
            for (let i=0; i<srcRowLen; i+=bytesPerPixel) {
                if (i%8 == 0) {
                    // the game uses RGBA
                    this.pixels.add(j+i).writeU32(0xff000000);
                }
            };
        };
    }

    scaleJs() {
        Memory.copy(this.customBuffer, this.pixels, this.bufferSize);
        let rowLen = this.pitch;
        let bytesPerPixel = this.bytesPerPixel;
        let dst = this.pixels;
        let src = this.customBuffer;


        for (let j=0, dj=0; j<Math.trunc(this.bufferSize/2); j+=rowLen, dj=j*2) {
            for (let i=0, di=0; i<Math.trunc(rowLen/2); i+=bytesPerPixel, di=i*2) {
                // get the pixel
                let byte = src.add(j+i).readU32();
                dst.add(dj+di).writeU32(byte);
                dst.add(dj+di+bytesPerPixel).writeU32(byte);
                dst.add(dj+rowLen+di).writeU32(byte);
                dst.add(dj+rowLen+di+bytesPerPixel).writeU32(byte);
            };
        };
    }

    getOriginalBytes() {
        return this.pixels.readByteArray(this.bufferSize);
    }
};

// look mom I can write ES6!
class SDLRect {
    constructor (ptr) {

        // create a new struct in memory if ptr==null
        if (!ptr) {
            this.ptr = Memory.alloc(8);
            this.setAll(0, 0, 0, 0);
        } else {
            this.ptr = ptr;
        }
    }

    setAll(x, y, w, h) {
        this.x = x;
        this.y = y;
        this.w = w;
        this.h = h;

        return this;
    }

    get x() {
        return this.ptr.readS16();
    }

    get y() {
        return this.ptr.add(2).readS16();
    }

    get h() {
        return this.ptr.add(4).readU16();
    }

    get w() {
        return this.ptr.add(6).readU16();
    }

    set x(val) {
        this.ptr.writeS16(val);
    }

    set y(val) {
        this.ptr.add(2).writeS16(val);
    }

    set w(val) {
        this.ptr.add(4).writeU16(val);
    }

    set h(val) {
        this.ptr.add(6).writeU16(val);
    }
}
Using these two classes, I tested if it worked with darken first.
// SDL_BlitSurface
Interceptor.attach(ptr(0x004665C0), {
    onEnter: function (args) {
        let src = new Surface(ptr(args[0]));
        let srcrect = new SDLRect(ptr(args[1]));
        let dst = new Surface(ptr(args[2]));
        let dstrect = new SDLRect(ptr(args[3]));
        send({
            hook_name: "SDL_BlitSurface",
            src: src,
            srcrect: srcrect,
            dst: dst,
            dstrect: dstrect,
        });
        src.darken();
    }
})
As it is shown, the js implementation is painfully slow, though this is not a surprise. Next step was to try scaling the blitted image, however here I ran into a number of problems that took me longer than I expected to resolve. I'll just sum them up:
- The target surface isn't always the display surface, meaning that the canvas may not be big enough to hold the scaled surface.
- Even if the surfaces are modified with custom allocated buffers, it would be too much work to keep track of them.
- Eventually I got the code to a working state by hooking the blit operations only where the destination surface is the video surface, though I quickly realized the shortcomings of my implementation: Most of the images have transparent pixels, which require calculations to blit them onto other surfaces. I would need to write a more intricate code in js to get that done, in the end the game would become even slower.
I ended up abandoning this approach as I didn't really need to handle each surface; I only needed to upscale the video surface. Then I started looking at the flip operation.
scaling and flipping
The final surface for each frame is processed and ready before an SDL_Flip call. So it makes sense to hook this call and scale the frame in onEnter. I used the scaleJs method here to see if it worked. It did but it was extremely slow, as it is expected from a hot function. At this point the only way was to use a native hook.
I weighed my options:
- implement a routine written by hand
- compile the SDL_BlitScaled from SDL2
I thought it would be a good exercise to write a custom routine using CModule, though I couldn't get that to work (turns out I was using a nonexistent type for a typedef and compiler errors weren't really descriptive of the error), so I eventually took the second route.
I cloned SDL git repository and found SDL_BlitScaled in SDL_stretch.c. This function is the same as SDL_BlitSurface except that it can handle different sized destination rectangles and it can scale the given source surface up or down onto the destination surface. However, calling this function directly wasn't the best approach here because:
- The function is a top-level function and it has many external calls.
- I'm only looking to scale a static surface, no clipping calculations required.
I checked out the inner calls of this function in order to find the best point to call, and I found SDL_SoftStretch. This function almost doesn't have any external calls, its an isolated code. This made compilation much easier and the resulting dll much smaller. I modified the code in order to get rid of the remaining dependencies:
- Inlined utility functions like
SDL_SetErrorandSDL_LockSurface - Removed unnecessary includes
- Changed main structs like
SDL_SurfaceandSDL_Rectwith the ones from SDL1.2 as there are important type changes that affect the offsets.
It took me some time to get together a build environment. I tried mingw and cygwin but 32bit build environments gave me more headaches than solutions. Finally I found everything packaged and ready-to-go in the llvm package here. I automated the process with a simple script (yes I'm using bash in windows):
#!/bin/bash

set -e

PATH="$PWD/compiler/bin:$PATH"

WORKDIR="$PWD"
SDLDIR="./SDL/src/video/"

[ -e "./SDL" ] || git clone https://github.com/libsdl-org/SDL

pushd $SDLDIR
git apply "$WORKDIR/sdl2.patch" || echo "error or already applied"
clang -m32 -Ofast -c -o stretch.o SDL_stretch.c -I ../../include
clang -m32 -Ofast -shared -v -o stretch.dll stretch.o
popd

cp $SDLDIR/stretch.dll ./
The dll exports the necessary function with the name SDL_SoftStretch:
int
SDL_SoftStretch(SDL_Surface *src, const SDL_Rect *srcrect,
                SDL_Surface *dst, const SDL_Rect *dstrect);
By calling this function right before SDL_Flip, I was able to achieve the scaling without a discernible performance penalty.
Remember how I couldn't find a stretch function in SDL1.2 api? Well, to my surprise, I stumbled upon the function SDL_SoftStretch in SDL1.2 code:
/** @internal Not in public API at the moment - do not use! */
extern DECLSPEC int SDLCALL SDL_SoftStretch(SDL_Surface *src, SDL_Rect *srcrect,
                                    SDL_Surface *dst, SDL_Rect *dstrect);
I think I wasn't able to find this before because it's not referenced in anywhere else in the code and I wasn't looking for this name until I found it in SDL2 code. What's better is that this function made its way into the game's binary; I found its offset and added it with the name stretchOld as an alternative to the SDL2 function.
This is the final state of the scale hooks:
class SoftStretch {
    constructor () {
        this.stretchDll = Module.load("C:\\Users\\erfur\\Desktop\\Mystery PI\\stretch.dll");
        this.softStretch = new NativeFunction(
            this.stretchDll.getExportByName("SDL_SoftStretch"),
            "int",
            ["pointer", "pointer", "pointer", "pointer"],
            "mscdecl"
            );
        this.softStretchLinear = new NativeFunction(
            this.stretchDll.getExportByName("SDL_SoftStretchLinear"),
            "int",
            ["pointer", "pointer", "pointer", "pointer"],
            "mscdecl"
            );
        this.softStretchOld = new NativeFunction(
            ptr(0x004A7DC0),
            "int",
            ["pointer", "pointer", "pointer", "pointer"]
            );
    }

    stretch(src, srcrect, dst, dstrect) {
        let ret = this.softStretch(src, srcrect, dst, dstrect);
        if (ret) {
            send({
                hook: "softStretch",
                retval: ptr(ret).readAnsiString(),
            })
        }
    }

    stretchLinear(src, srcrect, dst, dstrect) {
        let ret = this.softStretchLinear(src, srcrect, dst, dstrect);
        if (ret) {
            send({
                hook: "softStretchLinear",
                retval: ptr(ret).readAnsiString(),
            })
        }
    }

    stretchOld(src, srcrect, dst, dstrect) {
        this.softStretchOld(src, srcrect, dst, dstrect);
    }
}
I added a couple methods to use them in the Surface class:
    scaleNative() {
        Memory.copy(this.customBuffer, this.pixels, this.bufferSize);
        let srcrect = new SDLRect().setAll(0, 0, 800, 600).ptr;
        let dstrect = new SDLRect().setAll(0, 0, 1600, 1200).ptr;
        // send({
        //     hook: "scaleNative",
        //     dstrect: dstrect,
        //     srcrect: srcrect,
        // });
        ss.stretchLinear(
            this.customStruct,
            srcrect,
            this.ptr,
            dstrect,
            );
    }

    revert() {
        Memory.copy(this.pixels, this.customBuffer, this.bufferSize);
    }
I also implemented a class to access the current video device:
class VideoDevice {
    constructor() {
        this.currentVideo = ptr(0x004EFD40).readPointer();
        this.wmName = this.currentVideo.add(81*4).readPointer().readAnsiString();
        this.visibleSurface = new Surface(this.currentVideo.add(78*4).readPointer());
        this.screenSurface = new Surface(this.currentVideo.add(76*4).readPointer());
        this.iconifyPtr = this.currentVideo.add(65*4).readPointer();
        this.iconifyFcn = new NativeFunction(this.iconifyPtr, "int", ["pointer"]);
        this.fullscreenPtr = this.currentVideo.add(4*4).readPointer();
        this.fullscreenFcn = new NativeFunction(this.fullscreenPtr, "int", ["pointer", "int"]);
    }

    iconify() {
        this.iconifyFcn(this.currentVideo);
    }
}
Then hooked SDL_Flip to call the methods on the visible surface:
// SDL_Flip
Interceptor.attach(ptr(0x0046C810), {
    onEnter: function (args) {
        if (this.vd == undefined)
            this.vd = new VideoDevice();
        this.vd.visibleSurface.scaleNative();
    },
    onLeave: function (ret) {
        // revert otherwise next blits will be problematic
        this.vd.visibleSurface.revert();
    }
});
The visual side of things was done, though I wasn't quite done yet. At that point the game logic was working at 800x600 resolution and only the output was scaled to 1600x1200. This meant that the reported mouse input coordinates would be out of bounds and the game would not be able to handle them correctly, therefore I had to scale down the mouse coordinates.
taking care of the mouse coordinates
The game receives input events from SDL, in the form of SDL_event structs.
/** Event enumerations */
typedef enum {
    SDL_NOEVENT = 0,            /**< Unused (do not remove) */
    SDL_ACTIVEEVENT,            /**< Application loses/gains visibility */
    SDL_KEYDOWN,            /**< Keys pressed */
    SDL_KEYUP,            /**< Keys released */
    SDL_MOUSEMOTION,            /**< Mouse moved */
    SDL_MOUSEBUTTONDOWN,        /**< Mouse button pressed */
    SDL_MOUSEBUTTONUP,        /**< Mouse button released */
    SDL_JOYAXISMOTION,        /**< Joystick axis motion */
    SDL_JOYBALLMOTION,        /**< Joystick trackball motion */
    SDL_JOYHATMOTION,        /**< Joystick hat position change */
    SDL_JOYBUTTONDOWN,        /**< Joystick button pressed */
    SDL_JOYBUTTONUP,            /**< Joystick button released */
    SDL_QUIT,            /**< User-requested quit */
    SDL_SYSWMEVENT,            /**< System specific event */
    SDL_EVENT_RESERVEDA,        /**< Reserved for future use.. */
    SDL_EVENT_RESERVEDB,        /**< Reserved for future use.. */
    SDL_VIDEORESIZE,            /**< User resized video mode */
    SDL_VIDEOEXPOSE,            /**< Screen needs to be redrawn */
    SDL_EVENT_RESERVED2,        /**< Reserved for future use.. */
    SDL_EVENT_RESERVED3,        /**< Reserved for future use.. */
    SDL_EVENT_RESERVED4,        /**< Reserved for future use.. */
    SDL_EVENT_RESERVED5,        /**< Reserved for future use.. */
    SDL_EVENT_RESERVED6,        /**< Reserved for future use.. */
    SDL_EVENT_RESERVED7,        /**< Reserved for future use.. */
    /** Events SDL_USEREVENT through SDL_MAXEVENTS-1 are for your use */
    SDL_USEREVENT = 24,
    /** This last event is only for bounding internal arrays
 *  It is the number of bits in the event mask datatype -- Uint32
     */
    SDL_NUMEVENTS = 32
} SDL_EventType;

/** Mouse motion event structure */
typedef struct SDL_MouseMotionEvent {
    Uint8 type;    /**< SDL_MOUSEMOTION */
    Uint8 which;    /**< The mouse device index */
    Uint8 state;    /**< The current button state */
    Uint16 x, y;    /**< The X/Y coordinates of the mouse */
    Sint16 xrel;    /**< The relative motion in the X direction */
    Sint16 yrel;    /**< The relative motion in the Y direction */
} SDL_MouseMotionEvent;

/** Mouse button event structure */
typedef struct SDL_MouseButtonEvent {
    Uint8 type;    /**< SDL_MOUSEBUTTONDOWN or SDL_MOUSEBUTTONUP */
    Uint8 which;    /**< The mouse device index */
    Uint8 button;    /**< The mouse button index */
    Uint8 state;    /**< SDL_PRESSED or SDL_RELEASED */
    Uint16 x, y;    /**< The X/Y coordinates of the mouse at press time */
} SDL_MouseButtonEvent;
SDL_WaitEvent is called at the beginning of each loop:
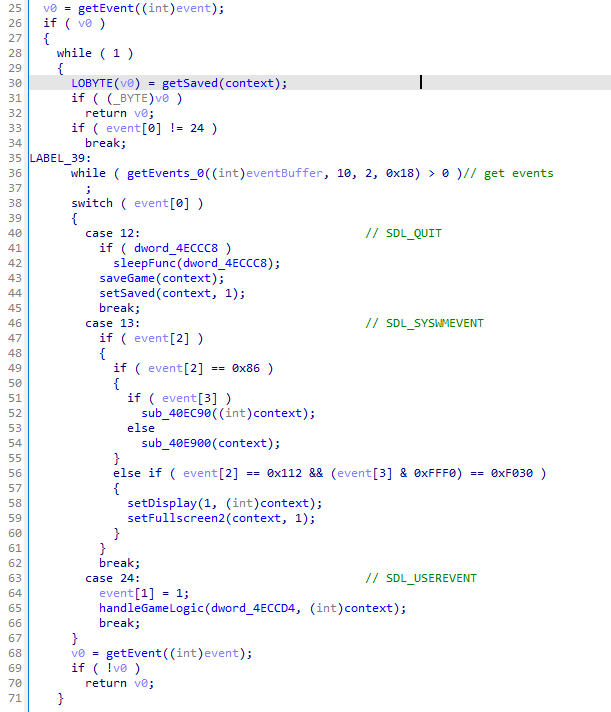
I hooked the function to modify the mouse input coordinates on-the-fly.
let eventPtr = null;
Interceptor.attach(ptr(0x00464380), { // calls SDL_WaitEvent
    onEnter: function (args) {
        eventPtr = ptr(args[0]);
    },
    onLeave: function (ret) {
        let type = eventPtr.readU8();
        if (type != 24 && type != 13) {

            if (type == 4) {
                // mouse motion
                let x = eventPtr.add(4).readU16();
                let y = eventPtr.add(6).readU16();
                eventPtr.add(4).writeU16(Math.trunc(x/2));
                eventPtr.add(6).writeU16(Math.trunc(y/2));
                let xrel = eventPtr.add(8).readS16();
                let yrel = eventPtr.add(10).readS16();
                eventPtr.add(8).writeS16(Math.trunc(xrel/2));
                eventPtr.add(10).writeS16(Math.trunc(yrel/2));
            } else if (type == 5 || type == 6) {
                // mouse button up/down
                let x = eventPtr.add(4).readU16();
                let y = eventPtr.add(6).readU16();
                eventPtr.add(4).writeU16(Math.trunc(x/2));
                eventPtr.add(6).writeU16(Math.trunc(y/2));
            }
        }
    }
})
I thought this hook was enough up until I saw that the input wasn't working in puzzle screens. After some more debugging I found out that in some cases the game would fetch mouse coordinates from the global variables with SDL_GetMouseState, so I had to hook that too.
Interceptor.attach(ptr(0x00462160), {
    onEnter: function(args) {
        this.x = ptr(args[0]);
        this.y = ptr(args[1]);
    },
    onLeave: function (ret) {
        let x = this.x.readU32();
        let y = this.y.readU32();
        // send({
        //     hook: "getMouseState",
        //     x: x,
        //     y: y,
        // })
        this.x.writeU32(Math.trunc(x/2));
        this.y.writeU32(Math.trunc(y/2));
    }
})
With the input patched, the goal was completely achieved and I was able to experience the game in glorious 1600x1200 resolution.
And that concludes part one. The final polished code can be found on github. I hope to be back with the rest of this series soon.